
Introduction To Primavera Software- Step by Step Guide
Introduction to Primavera Software: A Project Management Tool
Primavera software is a powerful project management tool that helps teams plan, schedule, and control complex projects. It is widely used in industries such as construction, engineering, and oil and gas, and is known for its ability to handle large-scale projects with many resources and dependencies.
Getting Started with Primavera Software
When you first open Primavera software, you will be greeted with the Home screen, which gives you a quick overview of your projects and their status. To create a new project, click on the “New Project” button in the top-left corner. You will then be prompted to enter the project’s name, start date, and finish date. Once you have created a new project, you can begin adding tasks, resources, and assignments. Tasks are the individual activities that make up your project, such as “Design plans” or “Install foundation.” Resources are the people, equipment, and materials that are required to complete the tasks. Assignments are the links between tasks and resources, indicating which tasks require which resources. Download the software from below. Download Primavera
Planning Your Project
One of the key features of Primavera software is its ability to create a detailed project plan. You can add tasks to your project and specify their duration, dependencies, and constraints. For example, you can indicate that task A cannot start until task B is completed, or that task C must be finished by a certain date. You can also create a Work Breakdown Structure (WBS) for your project, which is a hierarchical view of the tasks in your project. This can help you better understand the scope of your project and identify any potential issues.
Adding Activities and Creating Relationships
adding activities and creating relationships between them is a key part of creating a project plan in Primavera. Here is a step-by-step process for adding activities and creating relationships in Primavera:
- Open the project in Primavera and navigate to the “Activities” tab.
- Click on the “New” button in the top-left corner of the screen. This will open the “New Activity” dialog box.
- In the dialog box, enter the name of the activity, select the activity type, and specify the duration of the activity. You can also assign any relevant codes or labels to the activity.
- Once you have entered the activity’s information, click “OK” to save it to the project. You can repeat this process to add multiple activities at once.
- To create relationships between activities, select the activity that you want to create a relationship for and click on the “Predecessor” or “Successor” button in the top menu.
- Select the activity that the current activity is dependent on, and choose the type of relationship you want to create (Finish to Start, Start to Start, Finish to Finish, Start to Finish).
- Repeat this process for each activity, creating relationships as needed.
- You can also link activities by dragging and dropping them from one activity to another, and then specify the relationship between them, this is a visual way of creating relationship.
- Once you have created your relationships, you can use the “Update Schedule” button to automatically schedule the activities based on the relationships and dependencies you have specified.
- You can also create a Work Breakdown Structure (WBS) for your project, which is a hierarchical view of the tasks in your project. This can help you better understand the scope of your project and identify any potential issues.This is a general overview of the process for adding activities and creating relationships in Primavera.

Scheduling Your Project In Primavera Software
Once you have created your project plan, you can use Primavera to create a detailed schedule. The software will automatically calculate the start and finish dates for each task based on the dependencies and constraints you have specified. You can also adjust the schedule manually if needed, and add calendar exceptions to account for holidays and other non-working days. Scheduling in Primavera is the process of determining the start and finish dates of activities based on the relationships and dependencies you have specified in the project plan. Here is a general overview of the process for scheduling in Primavera:
- Open the project in Primavera and navigate to the “Activities” tab.
- Ensure that all activities have been added and that relationships and dependencies have been established between them.
- Go to the “Schedule” menu and select “Update Schedule”. This will automatically schedule the activities based on the relationships and dependencies you have specified.
- Primavera will calculate the earliest and latest possible start and finish dates for each activity based on its relationships with other activities. It will also take into account any constraints, such as mandatory start and finish dates, that have been specified for the activities.
- Review the schedule to ensure that it is consistent with the project plan and that all task dependencies and constraints are respected.
- Make any necessary adjustments to the schedule by dragging and dropping activities, adjusting the duration of activities, and reassigning resources.
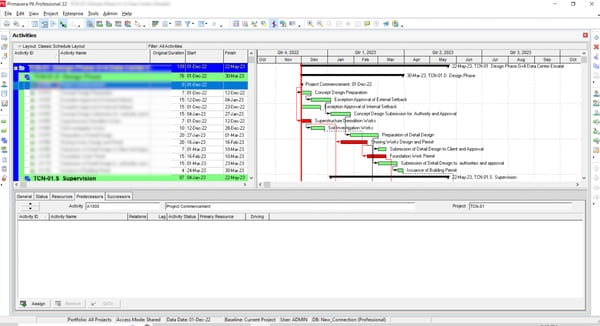
- Once the schedule is complete, you can use a variety of tools in Primavera to analyze and communicate the schedule to project stakeholders. For example, you can generate Gantt charts, histograms, and resource usage profiles to visualize the schedule and identify potential issues.
- It’s important to note that scheduling is an iterative process, as the schedule will need to be updated as the project progresses and new information becomes available.This is a general overview of the process for scheduling in Primavera.

Managing Your Project In Primavera Software
Once your project is underway, you can use Primavera to track progress and make adjustments as needed. The software includes a variety of tools for monitoring and reporting on project performance, including:
- Gantt charts, which show the progress of tasks over time
- Resource histograms, which show the resource usage over time
- Earned value analysis, which compares the planned value of the project with the actual value
You can also use Primavera to manage the costs of your project, including budgeting, forecasting, and actual cost tracking.
Resource Loading Procedure In Primavera Software
- Open the project in Primavera and navigate to the “Resources” tab.
- Click on the “New” button in the top-left corner of the screen. This will open the “New Resource” dialog box.
- In the dialog box, enter the name of the resource, select the resource type (e.g. labor, material, equipment), and assign any relevant codes or labels. You can also specify the resource’s availability, such as how many hours per day or week the resource is available to work on the project.
- Once you have entered the resource’s information, click “OK” to save it to the project. You can repeat this process to add multiple resources at once.
- You can also import resources from other sources, such as excel spreadsheet or other databases, by clicking on “File” -> “Import”.
- Once you have added resources to the project, you can assign them to tasks by going to the “Activities” tab and selecting the task you want to assign the resource to. In the task’s properties, go to the “Assignments” tab, and click on “New” to assign a resource.
- In the “Assignments” tab, you can also specify the role of the resource, the percentage of the resource’s time that will be dedicated to the task, and the cost of the resource.
- Finally, it’s important to note that you can also create a resource breakdown structure to organize resources and better understand how they are used in the project.This is a general overview of the process for loading resources in Primavera.
Resource Levelling Procedure In Primavera Software
- Open the project in Primavera and navigate to the “Resource Usage Profile” or “Resource Graph” view. This will display a graph of resource usage over time, allowing you to see where resources are over-allocated or under-allocated.
- Identify any resource conflicts or over-allocations by looking for red or yellow bars in the graph. These indicate that a resource is over-allocated for the given time period.
- To resolve resource conflicts, you can use the “Level Resources” feature. This feature will automatically adjust the schedule to ensure that resources are used efficiently. You can access this feature by right-clicking on the graph and selecting “Level Resources” or by going to the “Project” menu and selecting “Level Resources.”
- Once you have accessed the “Level Resources” feature, you will be prompted to select the resources you want to level and specify the leveling options. For example, you can choose to level only selected resources, or you can level all resources.
- Primavera will then adjust the schedule to level the resources. This might involve delaying certain tasks, splitting tasks, or adjusting the duration of tasks.
- Review the schedule after the leveling process is complete to ensure that the changes made are suitable for the project.
- Repeat the process as necessary if there are still resource conflicts or over-allocations.
It’s worth noting that resource leveling can also be done manually, by adjusting the start and finish dates of tasks, splitting tasks, and reassigning resources. However, it’s recommended to use the built-in leveling feature in primavera as it ensures that the schedule remains consistent and that all task dependencies and constraints are respected.This is a general overview of the resource leveling process in Primavera.
Conclusion
Primavera is a powerful project management tool that can help teams plan, schedule, and control large-scale projects. It’s feature-rich, and with a little bit of training, it can help you manage your project effectively. With its ability to handle large-scale projects with many resources and dependencies, Primavera software is a perfect fit for industries such as construction, engineering, and oil and gas.